Documentation
/Setup Guide
for Quick Setup you can use the Quick Start guide
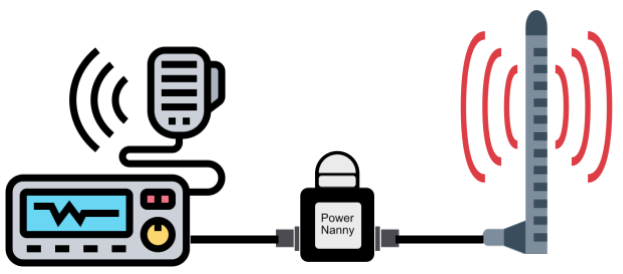
RF Power Nanny
RF Power Nanny is a headless RF power monitor. It can be placed in-line somewhere between your transceiver and your antenna feed point. It measures forward and reflected power and calculates SWR values. Note that RF Power Nanny measures the forward and reflected power and calculates the SWR for the section of the feed line where it is placed. If your radio has an internal tuner, your radio will show the tuned SWR. But RF Power Nanny will still show the raw un-tuned SWR of the feed line with antenna system.
When using an external tuner, you can choose on which side of the tuner you place your Power Nanny. When placed between radio and tuner, it will show the tuned SWR. However, when placed on the antenna side it will again show the raw un-tuned SWR value. Also when having a more complex feed chain with other devices, connectors and cables, you can choose the section of interest (near the antenna or near the radio).
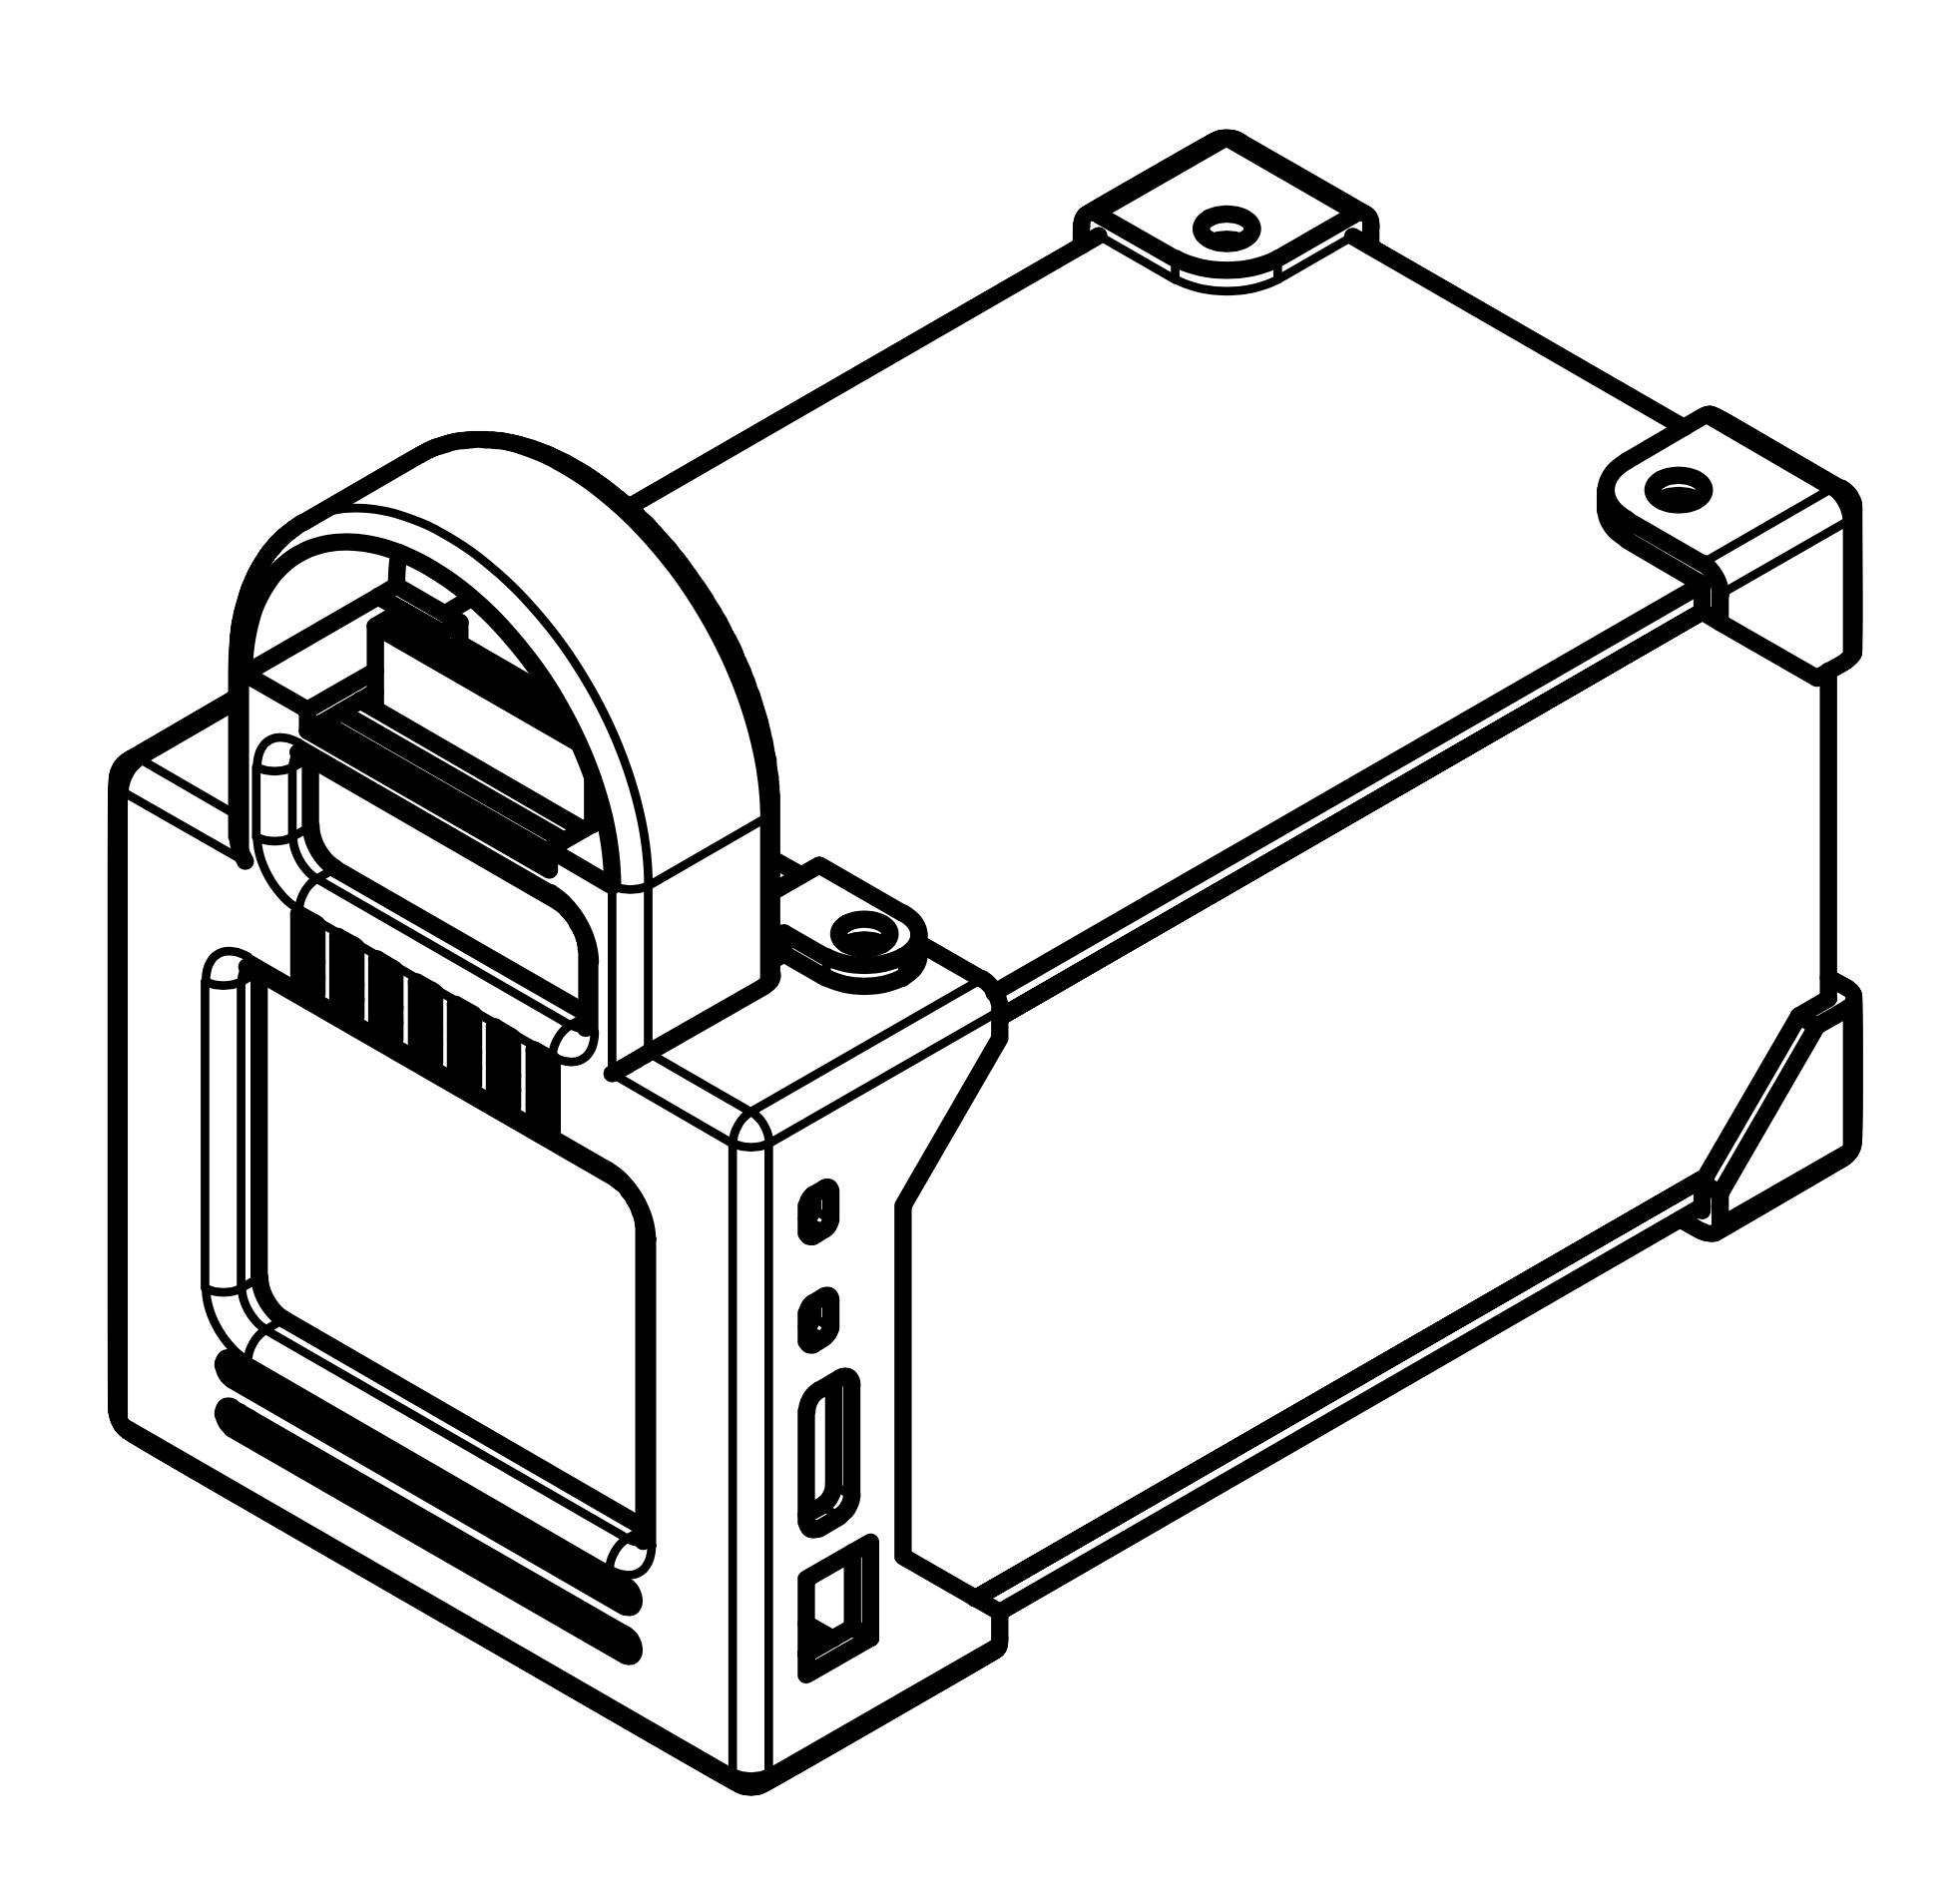
Tx / Ant Connectors
RF Power Nanny has two SO239 connectors. Facing the front of the Power Nanny, the left is where you connect your radio (Tx side) and the right goes to your antenna.
Power Require-ments
You can power it using USB (wall adapter or power bank) or other power sources like a battery or power supply using the JST connector. The current draw during operations is around 130mA. When power is provided a red LED will turn on. For more detailed info see Power Options.
Info LED
During operation and power-up the blue info LED provides feed-back information. When RF Power Nanny is trying to connect to your local area WiFi network it will be on. When connected it turns off. If Power Nanny is unable to connect or when there is an internal problem, it will blink. During normal operation it will flash shortly when measurements are taken.
WiFi Connection
RF Power Nanny will try to connect to your local area WiFi network. If it fails to connect, it will automatically switch to AP-mode (Access Point mode). This means it will act as an access point. You can still connect to it using a computer or mobile device by choosing the “PowerNanny” WiFi network in your WiFi settings. This can also be used in the field where there is no WiFi access or just to configure the device. Refer to the setup and provisioning section for detailed instructions on how to setup RF Power Nanny to be able to connect to your local WiFi network.
Blue LED is blinking
When Blue LED is blinking you need to switch to the PowerNanny WiFi network in your WiFi Settings to be able access RF Power Nanny
Blue LED turns off
When Blue LED turns off you can use your regular local WiFi network to access RF Power Nanny
Operating Modes
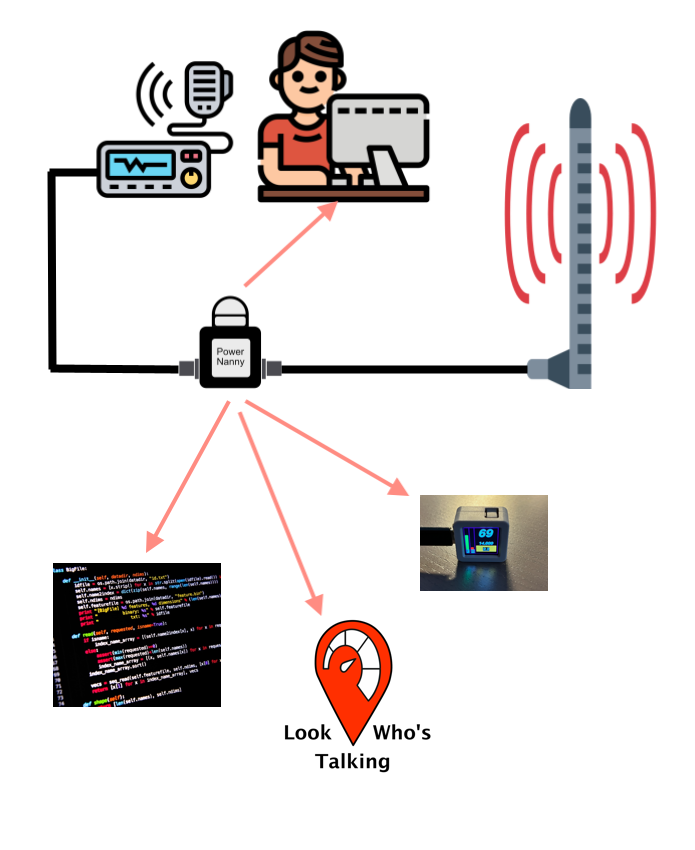
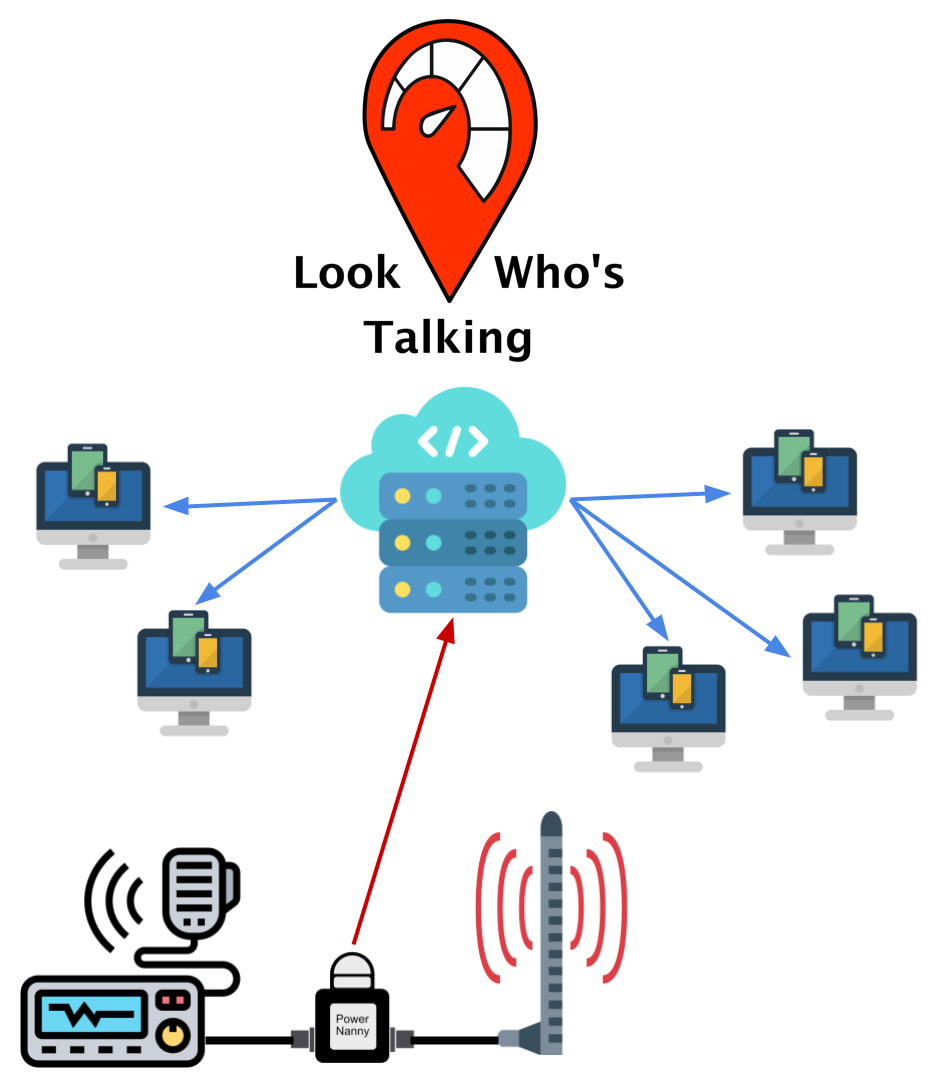
RF Power Nanny can be operated from any desktop computer or mobile device like a laptop, phone or tablet using a browser (or as an APP). Besides using a browser, Power Nanny can stream measurements to other devices using ESP-NOW or by using the API. This can range from a small external display to a lab test-setup for logging power related values. RF Power Nanny has a built-in webserver and doesn’t require internet access. It only needs internet access for updating its firmware or when you want it to share data and activity over the internet (see Look Who’s talking).
Power Options
RF Power Nanny can be powered using USB or by using the JST connector on the side. USB is usually a good option but certain precautions should be taken to avoid noise. The JST connection offers some additional power options like a battery or power supply.
USB
When using USB to power RF Power Nanny you should try to avoid noisy sources. These include some (cheap) wall chargers but also using a USB port from your computer (which tend to be noisy). A noisy source will do no damage but can produce interference which can be picked up by the receiver. In the field you could also use a power bank or even a small 9V battery (with the JST connector).
JST
The JST connector can be used to connect a power supply or batteries. Our advice is to use a linear power supply or a good low noise switching power supply.
When using the JST connector, the voltage should be at least above 5V. Higher voltages means that Power Nanny will have to dissipate more energy in the form of heat. This will warm up the front panel considerably (the front panel acts as a heat sink). Because of the fairly small dimensions of the Power Nanny, it will struggle to dissipate enough heat for voltages above 10V. It will get very hot over time. Although Power Nanny can handle these temperatures (for short durations), over a longer period (more than 30 minutes or so) it could have negative effects on some components over time. Our advice is to keep the voltage between 6 and 9 volts when using the JST connector.
If your power source has a higher voltage you could try to reduce the voltage using an external (linear) regulator. Our advice is to use a linear regulator or a good quiet switching step-down regulator. These linear type regulators (based on the LM317 for instance) are readily available for extreme low prices as bare modules.
Setup and Provisioning Guide
This section provides a comprehensive guide for setting up and provisioning your RF Power Nanny. To ensure seamless integration with your local WiFi network, follow the step-by-step instructions below.
WiFi Network Connection
Upon startup, RF Power Nanny initiates an attempt to connect to your local WiFi network. It requires the network name (SSID) and a valid password for this. If the information is not available (not stored in settings yet) or is incorrect, RF Power Nanny can not connect to your normal WiFi network. It will start a new private network and act as an access point, allowing you to connect and provision it with the necessary SSID and password for your regular WiFi network.
Provisioning Process
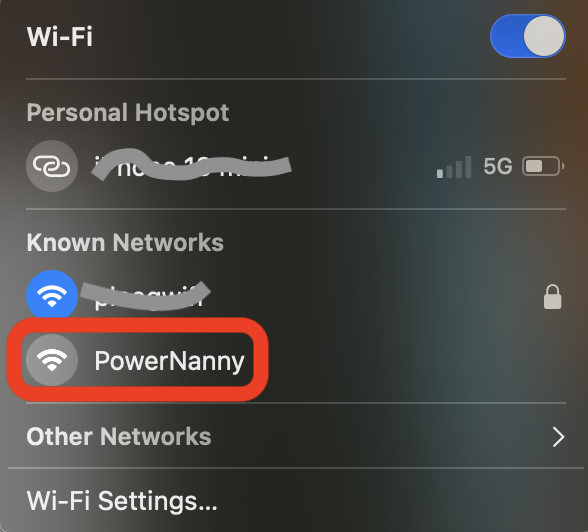
An un-provisioned Power Nanny device starts a temporary private WiFi network (it acts as an Access Point). Use your phone, tablet, or desktop computer to connect to this private network. Locate the network, named PowerNanny, in your WiFi settings and connect to it without requiring a password.
iPhone - RF Power Nanny will appear in your WiFi settings as PowerNanny Mac - RF Power Nanny will appear in your WiFi settings as PowerNanny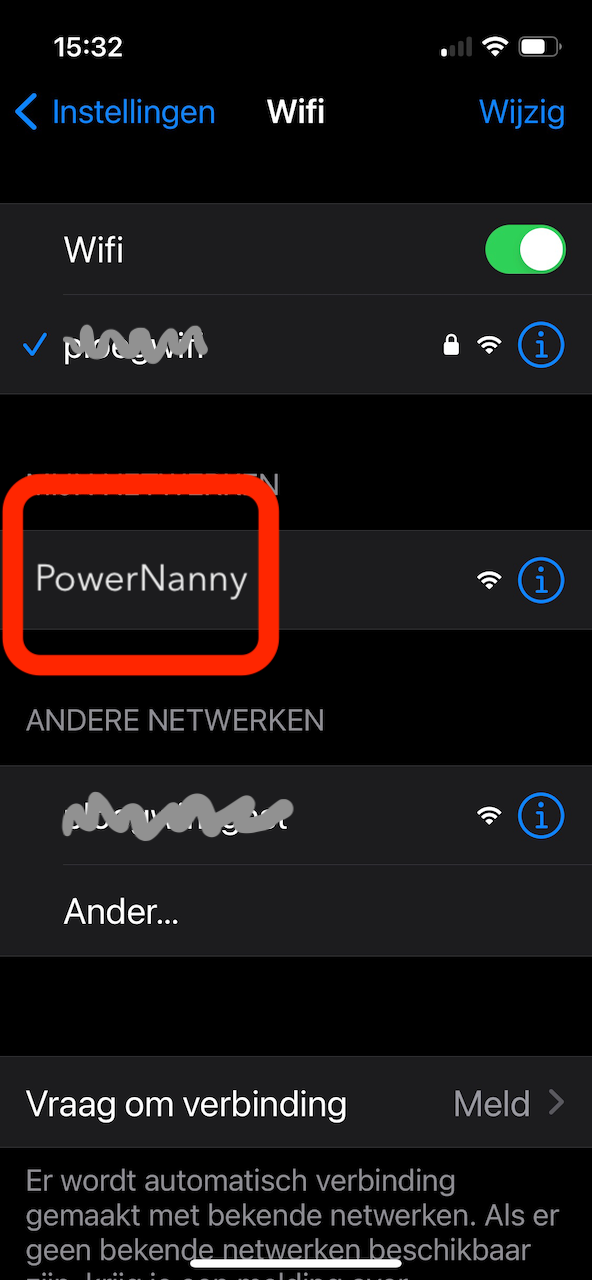
After connecting a computer or mobile device to the “PowerNanny” WiFi network, you can start your browser and type in the URL of your Power Nanny. By default, the address is “http://powernanny.local”. Be sure to use “http://” and not “https://”.
When connected open a browser on your PC or phone and enter the following URL:

Your browser may warn you that you are using an insecure connection. This is because Power Nanny doesn’t have a secure webserver and isn’t using https (the “s” stands for secure). The reason for this is that a secure webserver requires much more resoures and Power Nanny simply doesn’t have the power to do so.
Note: Some older phones or devices may not support .local (mDNS) name finding (e.g., older Android devices). If your browser cannot find “http://powernanny.local”, consider trying a different device for connecting to Power Nanny. Refer to Trouble shooting Network Setup for further assistance.
Now you should see the RF Power Nanny app loading in your browser. It will ask you if you would like to enter your network credentials. This is because it senses that it is running in AP mode. By configuring your local area WiFi network credentials, it will be able to connect directly to your regular WiFi network next time. This is more convenient; you can then connect to it without changing WiFi network in WiFi settings.
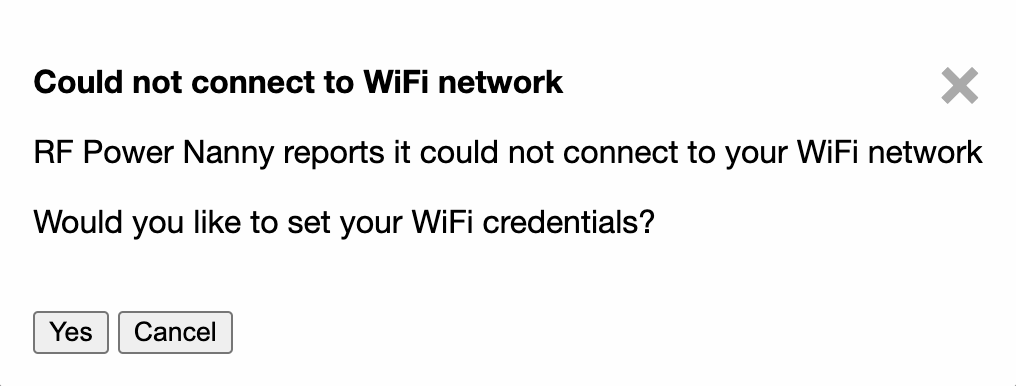
When started in AP mode it will ask if you would like to enter your network credentials
If you select Yes, you will be taken to the Power Nanny WiFi Setup screen. You can skip (Cancel) if you would like to keep RF Power Nanny disconnected from the network (you stay working in AP mode) but our advice is to setup a connection to your WiFi network when available.
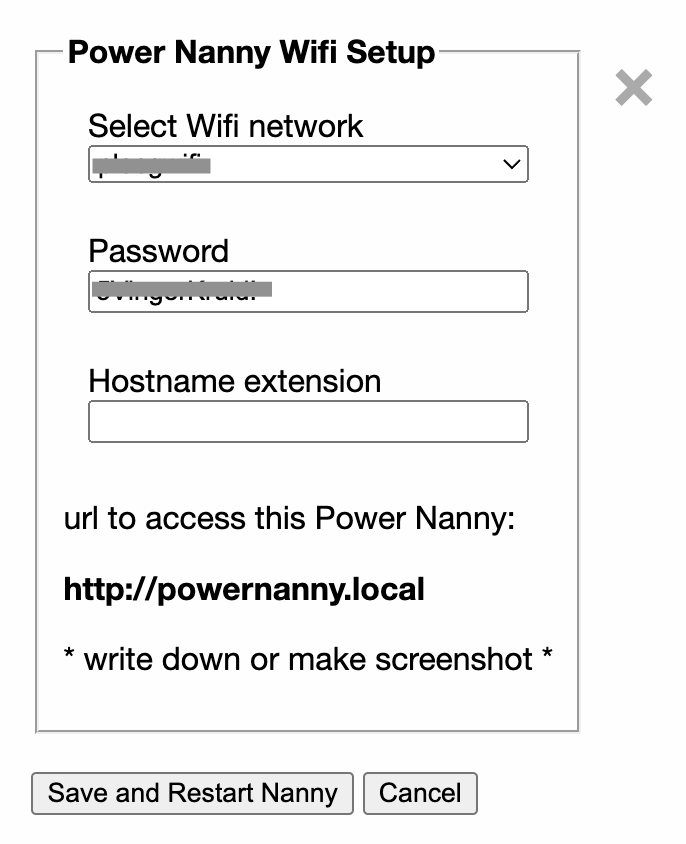
Power Nanny WiFi Setup screen
Here, input the correct credentials for your local WiFi network. Choose the WiFi network from the dropdown list and enter the WiFi password. Optionally, use the Hostname extension to provide a unique name for your Power Nanny. This feature is helpful if you have multiple RF Power Nanny devices, allowing each one to have a distinct URL (just leave it blank if you only have one Power Nanny). If you do have multiple Power Nannies use a short identifier for each. Keep the extension brief and make a note of it for future reference.
Press the “Save and Restart” button to save the settings to your Power Nanny. After receiving the new settings, it will reset and utilize the provided credentials to connect to your WiFi network during subsequent startups.
You can now access RF Power Nanny without switching WiFi settings on your computer or phone (just use your regular local WiFi network).
Loading the RF Power Nanny App
Once provisioning is complete, you can proceed to load the RF Power Nanny App. Follow the steps below to access the App through your internet browser (such as Safari or Chrome):
-
Enter the default URL: “http://powernanny.local” into your browser.
- If you provided a name extension during setup, use the format “http://powernanny-extension.local” (replace “extension” with your chosen name extension).
Installing the RF Power Nanny App
After successfully loading the App in your browser, it becomes fully functional. However, for an optimal App experience, an additional step is recommended. The Power Nanny App has built-in settings to use it as a PWA (Progressive Web App). This means that you don’t need a web browser and don’t need to enter the URL each time. You can turn it into regular application. Each operating system and browser has its own way of doing this.

-
Phone - Save the App to your home screen.
- On iPhone: Open Safari, tap the share button, and choose “Add to Home Screen” from the menu.
- On Android: Open Chrome, Edge, or Firefox, and select “Add to Home Screen” or “Add to Phone” from the menu.
-
Desktop computer - Install as an App.
- Most browsers offer an option “Install as an App” in their settings.
- With Safari you can click the share button and “add to Dock”.
Now, you will have a dedicated App icon on your home screen or in your applications, providing easy access to the App and in full-screen mode on your phone.
Using RF Power Nanny in the field (away from your WiFi network)
When you power up your RF Power Nanny in the field, it will fail to connect to your WiFi network. The blue LED will start blinking. This means it has started an Access Point for you. You first have to switch to the “PowerNanny” WiFi network in your WiFi settings on your phone or computer. After connecting to the “PowerNanny” WiFi network, you can use your browser and enter the Power Nanny URL just like you would normally.
There’s one disadvantage of working in this (Access Point) mode; you do not have internet access. That means that your activity can not be shared on Look Who’s Talking and you can not use other websites while connected to the “PowerNanny” WiFi network.
You also could use a hotspot in the field. That would eliminate the internet access problem. But then you would have to change the WiFi settings of your Power Nanny to point to the hotspot. For longer usage that would be fine. If you only want to do a quick check of your antenna system it would probably be easier to use the AP mode of Power Nanny.
Trouble shooting Network Setup
Understanding the status of RF Power Nanny can be facilitated by monitoring the blue info LED. When powering up or after a reset, the blue LED turns on when Power Nanny is trying to connect to your local WiFi network with the credentials provided during setup and provisioning (if any). It can take a few seconds to establish the connection. If it fails after about 10 seconds, the blue info LED will start blinking. This means it could not connect to your local WiFi network, and it has started an Access Point for you. So, you can still connect to Power Nanny after switching to the PowerNanny WiFi network in your WiFi settings.
Normal sequence:
- Power-up
- RED LED turns on
- Power Nanny tries to connect with stored network credentials (if any)
- BLUE LED turns on
- If successful
- BLUE LED turns off (you can now connect to it using the Power Nanny URL from any browser on the local WiFi network)
- If NOT succesful
- BLUE LED starts blinking (you can connect to it only after switching to the PowerNanny WiFi network in your WiFi settings)
Using IP address
When Using .local (mDNS) name like powernanny.local does not work:
You should be able to connect to your Power Nanny using the URL “http://powernanny.local”.
However, if entering the correct URL does not load the App, your device may not support “.local” (mDNS) names. To resolve this, try an other device or use an IP address instead of using the .local mDNS name. Type the IP address in the browser address/search bar, such as “http://xx.xx.xx.xx” (do not use “https”).
In AP mode, when Power Nanny is not connected to your local WiFi network (blue LED is blinking), the IP address is fixed and will be 192.9.200.1 (don’t forget to select the “PowerNanny” WiFi network in your WiFi settings first).
URL Lookup Tool
If RF Power Nanny connected to your WiFi network successfully (blue LED not blinking), you can also use our URL Lookup Tool to find the correct URL to access it. The tool will report both, the “.local” (mDNS) URL and the IP URL. See Apps.